
Tie-Dye Milk.
Hopefully, the name of this lab experiment got your attention. What on earth is tie-dyed milk?
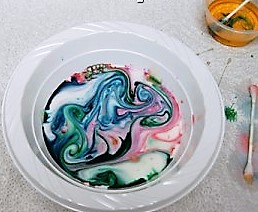
Believe it or not, a plate of milk, a few drops of food coloring and one drop of dish washing liquid turns into a psychedelic experience.
This is a fun experiment for all ages. I just performed this in my Honors Chemistry class and they loved it! Many pictures were posted on Instagram. I have also done this with elementary age children and it’s a big hit with them, too!
Aright, so here is what is required for this experiment.
Materials:
Milk (2% or whole – it must have fat in order for this to work)
Paper plate (or paper bowl)
Food coloring
Dish washing liquid
Pour enough milk onto the plate to cover the bottom. (If you are doing this with younger children, you might want to use a paper bowl – just to make sure the table is not bumped and milk goes everywhere!) If you use a paper bowl, fill it just under half-way full.
Have your students put small drops of different colored food coloring on top of the milk. Place at least 4 drops and do not put them right next to each other.
Now while everyone is watching, place one drop of dish washing liquid directly in the center of the milk.
Boom! You will see the colors begin to swirl immediately and form tie-dye patterns.
You can have the students gently blow on top of your mixture in order to direct the pattern a bit.
What is happening?
The elementary explanation is that the soap is breaking up the fat in the milk. The food coloring is being pushed around as this happens. It just allows us to see that fat being broken apart. It is the reason why dish washing soap can clean dirty, greasy dishes.
The secondary explanation is that non-polar covalent substances can only be broken apart by another non-polar covalent substance. The fat in the milk makes it non-polar covalent. A soap molecule has two ends: one end is ionic and one end is non-polar covalent. Because the food coloring is less dense than the milk, it will sit atop the milk and allows us to see the results of the chemical bonds breaking. It does so in quite an artistic pattern.
I have to add a note here; I love it when my students think “outside the box” or in this case “outside the plate”. This happened during this lab last month. My lab assistant had helped to organize all of my cabinets, so he was very familiar with their contents. He was in my Chemistry class and he had an idea. He asked permission to get out a super absorbent powder that I have stowed away. (It’s the same stuff that is used in diapers) He knew that it absorbed liquid quickly and turned into a gel.
Of course, I allowed him to go to the cabinet and then carry out his idea. He added the powder after the milk had turned into a cool tie-dye pattern. It immediately turned to gel, preserving the piece. This added a new dimension to this lab that I had never thought about before. I love it when that happens!
Have fun with this lab. Make sure you bring enough materials so you can do this a few times. Experiment with where you place the colors. Let me know if you try this and you can even send me your pictures or videos. I would love to see them.